Saturday, January 31, 2015

Shark Tail And Cat Tale

Cats presumably like fish and here is a nice dinner look! We've tried the shark fin soup once and it wasn't as bad as expected. Same with the nails...

What makes it special: The water tattoos you are going to use

How long it lasts: It lasted about 15 minutes because I was late for a meeting so the moment I started putting my shoes on, I damaged the design on my thumbs. My bad.  

You need:
  • 3 kitties
  • Base coat nail polish
  • White nail polish
  • Top coat
  • Water stickers

To cook this look you need:
  1. Apply the base coat
  2. Apply two coats of white nail polish. Wait to dry.
  3. Meanwhile cut the water stickers into pieces so it can fit your fingers.
  4. Apply the water stickers according to the instruction. In my case I had to put the water sticker and press each piece for 30 seconds. 
Cat tip:
Use white nail polish because it will give better base for the water sticker. White makes good contrast.


Friday, January 23, 2015

Chameleon Cats

For this ultimately simple design you need:
  • 3 kitties
  • Base coat nail polish
  • Chameleon nail polish
To cook this look you need:
  1. Apply the base coat
  2. Apply two coats of chameleon nail polish. 
  3. Wait to dry. 

Thursday, January 22, 2015

Work In Progress: Nail Protectors

Here is how to protect your fresh and wet nail polish from fluffy damage:

You need:
  • Three kitties
  • Nail polish
  • Nail protectors


Wednesday, January 21, 2015

Black Matte Mix

This is a mixture of different approaches to black. Initially I planned to have only the shiny French on
matte black. Then I saw the caviar in my box and then it all got mixed. 

What makes it special: The mix of matte and shiny all created with black

How long it lasts: About three days. I find the caviar very hard to handle. 

To cook this look you need:
  • 3 kitties
  • Base coat (optional)
  • Black nail polish
  • Matte nail polish
  • Top coat
  • Dotting tool or anything that helps you make dots (optional)
  • Nail caviar in black
  • French tips tape (optional)


Steps:
  • Apply base coat (I do it, otherwise the nail becomes very dark because of the black nail polish) and wait to dry
  • Apply one layer of black nail polish and wait to dry
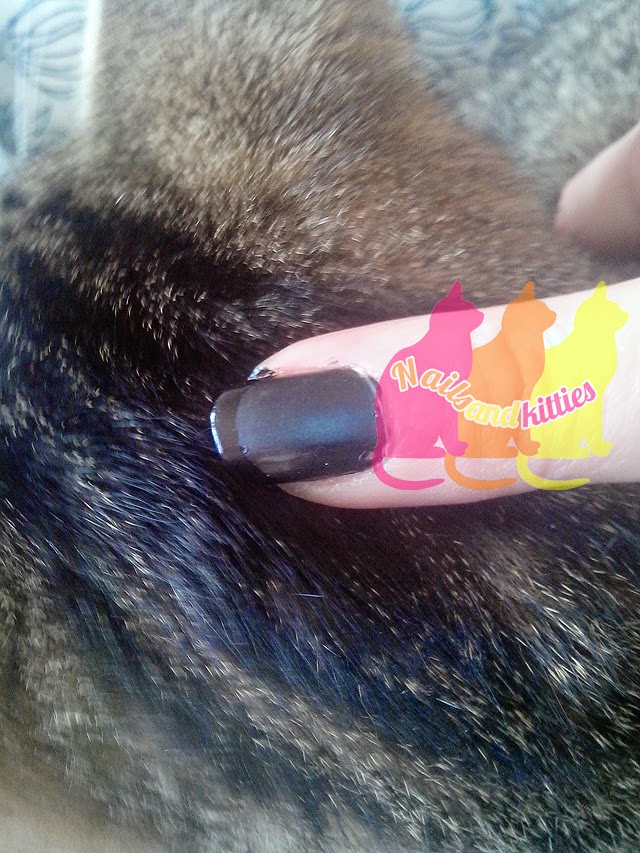
Caviar:

  • Having the first layer of black nail polish, select which fingers do you want to have the caviar.
  • Apply second layer of black nail polish on one of them.
  • Immediately - while still wet dip the nail in the caviar glass/box
  • Carefully press the caviar pigment to the nail. The wet nail polish works as a glue.
  • Apply top coat. It will help the caviar stay there.
  • Repeat with other finger(s)


Then apply second layer of black nail polish to the rst of the fingers and wait to dry.

Water drops effect:

  • Apply a coat of matte nail polish on selected fingers. Wait to dry.
  • Dip the dotting tool in the black nail polish and make small dots with it on the matte nails. (optional) Alternatively you can make drops with the nail polish brush but this never works with me. 

French Matte:

  • Apply a coat of matte nail polish on selected fingers. Wait to dry. Seriously. Wait to dry.
  • Put the French tip tape (optional) or draw a line with the black nail polish


Sunday, January 18, 2015

Floral French

What makes it special: The fresh colours

How long it lasts: About six days.

To cook this look you need:
  • 3 kitties
  • Base and top coat 
  • Yellow nail polish
  • Light (lime) green nail polish
  • Dark green nail polish
  • Red nail polish
  • Orange nail polish
  • Dotting tool
  • Toothpick 
  • (optional) Stickers for French if you don't have stable hand to draw a line
Optional:
  • Glitter hexagon nail polish 

Steps:
  1. Apply the base coat. Wait to dry.
  2. (optional) Put the stickers for the French on your nails.
  3. On some of the fingers apply yellow nail polish and on the rest apply lime green. If you have placed the stickers, remove them while the nail polish is still wet. Wait to dry.
  4. Dip the dotting tool in the red nail polish and create five red dots for each flower on each finger. On the thumbs you have more space so you can make two or three flowers. Wait to dry.
  5. Dip the dotting tool in the orange nail polish and place a dot in the center of each flower. Wait to dry.
  6. Take the toothpick and dip it in the lime green nail polish to create the basic leafs. 
  7. The other side of the toothpick-stick dip in dark green and create the accents in the center of each leaf.
  8. Wait to dry.
  9. If you want, you can put a final light coat of glitter hexagon nail polish. I used white hexagons and orange glitter.
  10. Apply top coat.

Thursday, January 15, 2015

Fluffy In Pink And Blue


What makes it special: The velvet texture and the colours.

How long it lasts: Two days with me. At the end of the very first day some of the fluff was already pretty damaged.

To cook this look you need:
  • 3 kitties 
  • 2 velvets 
  • 2 nail polishes in similar color 


Steps:
  1. Apply base coat 
  2. Apply one layer of coloured nail polish 
  3. Then here we come to the tricky part:
  4. One by one apply colour nail polish on each nail and then immediately dip it onto the nail velvet. Repeat with each finger.
  5. Tap the velvet onto the nail with flat object like the wide side of your tweezers. Alternatively tap with a finger.
  6. Tap the excess of the velvet.
  7. Clean up the mess. Keep the cats away because they come to sniff.


Tuesday, January 13, 2015

Stamp Mess On Nails

It started as a water marble design and then a colleague gave me a stamper. What followed is just a mess of colours.

What makes it special: The fun brought by the stamper.

How long it lasts: With this (ugly) design it didn't stayed longer than a day.

To cook this look you need:
  • 3 kitties
  • Base coat
  • Top coat
  • Nail polish in light colour on top of the base
  • Nail polishes in various colours for the stamp effects
Steps:
  1. Apply the base coat
  2. Apply the light nail polish
  3. Start stamping
  4. Apply top coat

Sunday, January 11, 2015

Jackson Pollock Style

It was meant to be a water marble, then I messed it up and the result is a sort of Pollock style.

What makes it special: The dotted contrast made by the water marble and the hexagons

How long it lasts: About five days. The texture allows small repairs of the nail polish so as soon as the edges start to peel off you can keep them a day or two more by applying transparent or lightly glittered top coat.

To cook this look you need:
  • 3 kitties
  • Base coat (optional)
  • White nail polish (I had white with sand effect light glitter)
  • Blue nail polish
  • Pink nail polish
  • Yellow nail polish
  • Black nail polish
  • Pink hexagon glitter
  • Black hexagon glitter
  • Top coat
  • Plastic coffee cup (fill it with water)
  • Stick (toothpick or even pencil, everything works)
  • (Optional) Tape or hand cream
  • Nail polish remover and some cotton for it


Steps:
  1. Apply the base coat
  2. Apply one or two (or three) layers of white nail polish. My white was pretty crappy so I had to apply three. Wait for it to dry.
  3. (Optional) Cover your fingers with the tape or carefully cover the skin with the hand cream. This is optional because the water marble makes a total mess which can be cleaned with nail polish afterwards. According to me: it is better if you have less to clean from the skin.
  4. In the cup filled with water drop pink nail polish, then yellow, then black, then blue. 
  5. Dip some of your fingertips - two, three or all of them! In this case I did the thumb and the pinky in one turn and the rest on the other. You can do one by one but I don't find it very productive.
  6. With the stick or the object you have chosen to serve as a stick, mop up the surface of the water in the cup. 
  7. Take out of the cup your fingers. 
  8. Repeat 4-7 until you cover all your fingers with colourful nail polish. 
  9. Wait to dry. If you are satisfied with the result, you can skip the next steps. Personally I liked the contrast on some of the fingers but I was highly disappointed with others so I went on. 
  10. Apply the hexagon glitter - act creatively. You can put some black hexagon nail polish on the light colours (yellow, white) and pink on the darker (blue, dark pink) or just anything on anything (which I did)
  11. Apply top coat. I always apply top coat. 


Sunday, January 4, 2015

Christmas Stickers

What makes it special: The starry Christmas night created by the gradient and the glitter

How long it lasts: About five days with me. It could be longer but I did it for the New Year's Eve and on the very next day I was already eager to try something else so I could hardly wait to remove it.

What you need to cook this look:
  • 3 kitties
  • Base/Top coat
  • Light gray or white nail polish
  • Blue nail polish
  • Dark blue nail polish
  • Transparent Glitter in blue 
  • Christmas stickers
  • Sponge
  • Nail polish remover
 Optional:
  • Tape
  • Spray for quick drying (because I used cheap nail polishes and it takes them ages to dry)


Steps:
  1. Apply the base coat and wait for it to dry.
  2. (optional) Cover your fingers in tape.
  3. Take the sponge and put next to each other a few drops of the light gray and the blue nail polish
  4. Start tapping until you create a satisfying gradient (ombre). It may take a few layers. In my case the light gray was too light and needed more coats so I applied it directly on the nail, waited to dry a little and sponged again.
  5. Apply tiny drops of dark blue on the darker side of the nail. Tap with the sponge but be careful not to mix it with the light shades of the gradient. 
  6. Wait to dry. (Optional) Spray with the quick dryer. 
  7. Place the stickers on your nails. 
  8. Apply thin line of the transparent blue glitter on the dark side of the gradient.
  9. (the optional #2) Remove the tape. 
  10. Use the nail polish remover to clear the mess from the skin around your pretty gradient.
  11. Apply top coat. (Optional) Spray with the quick dryer.